
Gallery
Videos
|
Kargath
Before Kargath was a warlord, he was a slave. Before he ruled the Shattered Hand, he was a gladiator. Before he found deliverance, he sought vengeance.
Take your place on the front lines of the battle for Draenor 11.13.14. Durotan
|
Grommash
Grommash Hellscream’s legend was not born from mere brutality or conquest. His indomitable will helped him survive the impossible . . . but only after his recklessness nearly cost him everything.
11.14.14 Kilrogg
|
|
The unforgiving land of the Frostwolf clan does not reward sentiment. When young Durotan’s mother fell deathly ill, he had a choice: Allow her life to come to a natural end, or pay a heavy price to save her.
11.13.14 |
The Bleeding Hollow clan once stood on the verge of extinction. To escape death, Kilrogg Deadeye first needed to embrace it.
Take your place on the front lines of the battle for Draenor. 11.13.14. |
Maraad
Vindicator Maraad battled the demonic orcs of the first Horde. He witnessed the slaughter of his people in Shattrath. It was the draenei’s darkest day, and Maraad’s greatest test . . . and the memory of his actions have haunted him ever since.
Take your place on the front lines of the battle for Draenor
11.13.14.
Take your place on the front lines of the battle for Draenor
11.13.14.
Adoons for start
|
Name
|
Files
| ||||||||||
For more Addons :
How do I install an AddOn?
To manually install your mods:
1. DOWNLOAD your chosen addon
2. Extract the files to a folder on your desktop.
3. Open your WoW folder.
If using a PC, the typical default install path is:
C:\Program Files\World of Warcraft
If using a Macintosh, the typical default install path is:
Macintosh Main HD (or whatever you renamed it to, if you did)/Applications/World of Warcraft
4. In the WoW folder, create a new folder called Interface (if it doesn’t already exist)
5. Open that folder, create another one inside it, called AddOns (again, if it doesn’t already exist)
6. Open the AddOns folder
7. Copy the files from the folder on your desktop into the AddOns folder
8. Your final path should look like:
PC:
C:\Program Files\World of Warcraft\Interface\AddOns\< ModAFolderName >\< files >
C:\Program Files\World of Warcraft\Interface\AddOns\< ModBFolderName >\< files >
C:\Program Files\World of Warcraft\Interface\AddOns\< ModCFolderName >\< files >
Mac:
Macintosh HD/Applications/World of Warcraft/Interface/Addons/< ModAFolderName >/< files >
Macintosh HD/Applications/World of Warcraft/Interface/Addons/< ModBFolderName >/< files >
Macintosh HD/Applications/World of Warcraft/Interface/Addons/ < ModCFolderNaem >/< files >
(where < ModAFolder > < .B. > < .C. > are the names of the actual folders that the mods create)
9. Log into game. At the character select screen, there should be an "AddOns" button in the lower left corner. Click on that. If any of the mods in the list that pops up say "out of date" or some such, choose the "Load Outdated AddOns" option.
10. Log the rest of the way into game, you should be up and running now. :)
Macros Tutorial
If you’re not using macros then you’re missing out. Apart from simply practicing and learning your class, nothing else can improve your play and elevate your overall performance in the way that using macros can. Unfortunately, I think a lot of players don’t bother with them because they either: don’t know about them -or- are intimidated by what appears to be a bunch of techie mumbo jumbo.
I’m going to show you how easy it is to get up and running with macros…
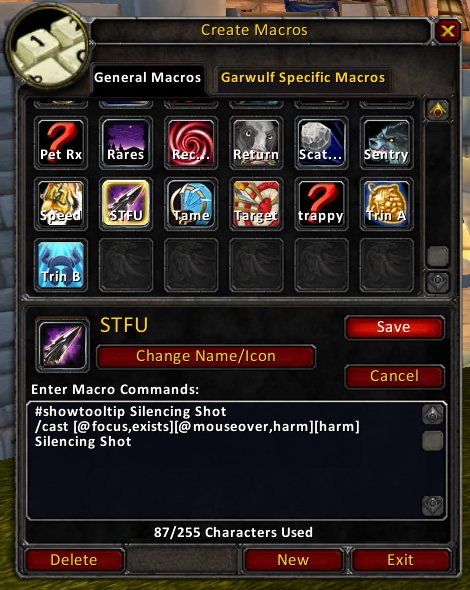
1) First off, pick a macro that you want to use for your hunter by selecting one from my macros page. Copy it to your clipboard by selecting all of the macro text, then hitting ctrl+c (command+c on a mac). For this example, I’m going to show you how to create a macro for Silencing Shot.

2) Open up your Macros interface in WoW by going to the game menu (esc key) and clicking on Macros.
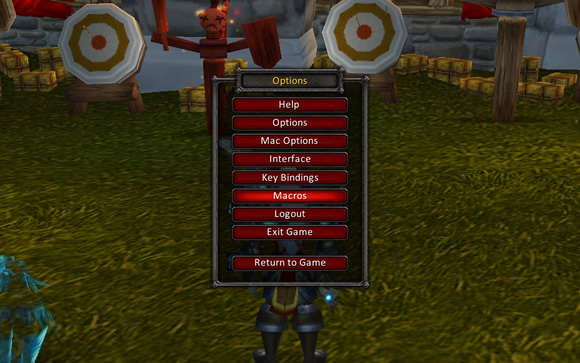
3) You can select whether you want it to be a General macro, accessible across all characters -or- you can make it character-specific by selecting one of the tabs at the top. Next, click ‘New”.
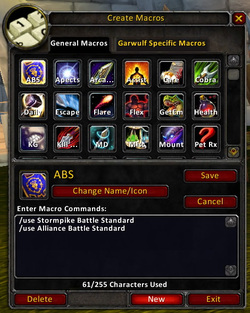
4) Enter the name of the macro – usually 3-6 characters is fine, then click ‘Okay’.

5) Click inside the blank window and paste in the copied macro text by hitting ctrl+v (command+v on a mac).
6) Click and drag the macro icon from the Macros interface down to your action bar and start owning with it!
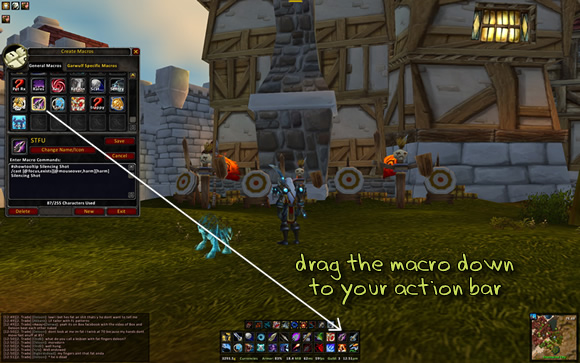
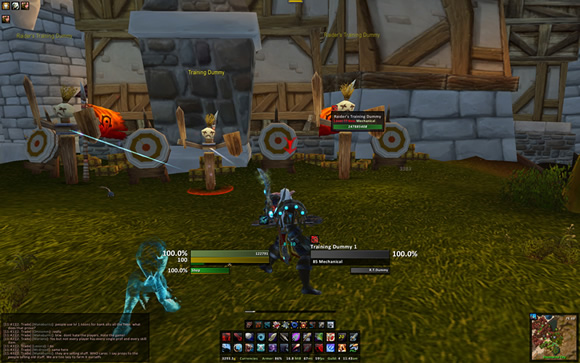
7) In the image below, notice how I am able to simultaneously Silence one target while maintaining pressure on another – without having to re-target..? I am DPS’ing the center target dummy while at the same time silencing the one on the left. The image doesn’t show it, but I didn’t have to drop my current target in order to silence the other.
I vastly improved the usability and efficiency of my Silencing Shot ability just by taking a minute to enhance it with a macro. I made it so that my Silencing Shot will instantly hit my enemy focus target if I have one designated, or fire at a mouseover target if I have one – all while I’m still pounding away on my primary kill target.
These types of enhancements to your abilities can transform your game play, so please start using macros if you aren’t already.
Hopefully this short tutorial will help to demystify the practice of configuring and using macros.
What are you waiting for… start setting up some macros!
Good luck and happy hunting!
What are you waiting for… start setting up some macros!
Good luck and happy hunting!
Garrisons are an integral part of the leveling game in Warlords of Draenor, but they're also part of the endgame, too -- collecting various followers and sending them on the appropriate missions will net you rewards like gear, gold, resources, and more. But although I love the garrison game, when you've got 20 followers, trying to keep track of who does what is almost a logistical nightmare. Sure, there's only a handful of threats that your follower's abilities need to counter, but remembering which follower does what is something that I still haven't mastered.
Beyond that, the mission interface itself is decent and fairly intuitive, but it's not quite as user-friendly as it could be. So it was with great anticipation that I awaited the inevitable addons that would take missions and follower management to the next level -- because if there's one thing I've learned in 10 years of gameplay, it's that addon authors are ridiculously talented when it comes to redesigning UI functions into elegant masterpieces of design. And the addon Master Plan by Foxlit has done exactly that with the missions and follower interface.
Beyond that, the mission interface itself is decent and fairly intuitive, but it's not quite as user-friendly as it could be. So it was with great anticipation that I awaited the inevitable addons that would take missions and follower management to the next level -- because if there's one thing I've learned in 10 years of gameplay, it's that addon authors are ridiculously talented when it comes to redesigning UI functions into elegant masterpieces of design. And the addon Master Plan by Foxlit has done exactly that with the missions and follower interface.
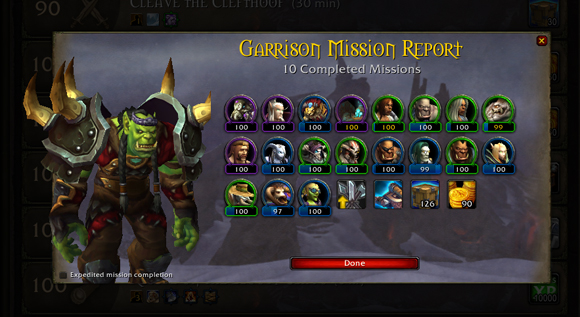
The first thing you'll notice when you fire up Master Plan, if you have missions waiting to be completed, is that the addon will automatically complete a batch of missions in one lump sum, removing the "click on the treasure chest" element of turning in missions. There is a checkbox to turn off this option, for people like me that enjoy watching my followers complete their missions and clicking on the treasure chests to see what I've gotten. If, on the other hand, you're one of those people that enjoys a one-click complete-all style, it's available. Who knows -- several months down the road, I may grow tired of clicking through each mission and turn the option back on.
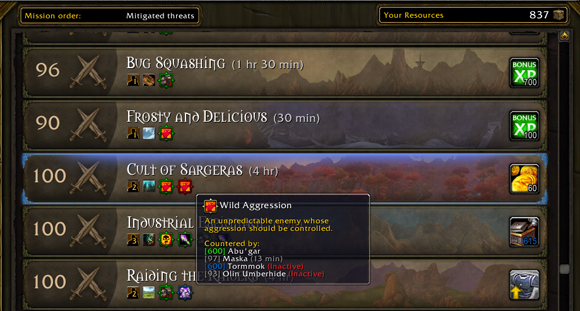
But the mission interface itself has far more surprises. Usually, missions are sorted by level -- highest level missions at the top of the screen, lower level missions at the bottom. Master Plan allows you to sort your mission order not by mission level, but by Mitigated Threats. The genius of Master Plan is that it will automatically go through your available missions, and match those against the followers you currently have free to complete missions -- and the missions you can readily complete will always be listed at the top of your mission interface.
In addition, each mission now lists icons of the threats it presents -- and mousing over those icons will give you a handy list of who, in your pile of followers, is capable of countering that particular threat, along with that follower's status. If a follower is currently on a mission, their icon will be greyed out, and the time in which they will return from their current mission is displayed. And just in case that doesn't make things clear enough for you, threats that you are able to immediately counter with available followers are outlined in green -- threats that you cannot currently counter are outlined in red. This helps you decide which missions are currently worth clearing out, and which should probably be saved for later.
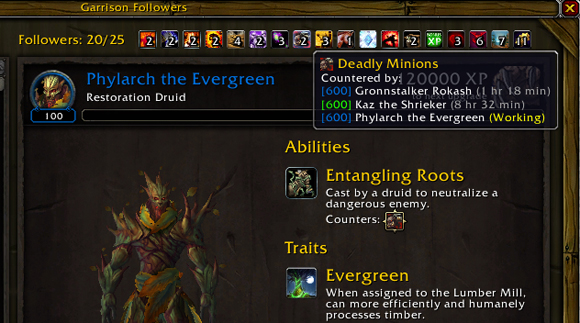
As for your followers, Master Plan displays numeric values in their XP bars, so you can see exactly how much XP they need in order to hit the next level, or quality level. In additon, the followers interface contains a row of icons at the top of the pane that clearly displays how many followers you have for countering each type of threat. It also lists any traits your followers possess -- including any profession buildings they are capable of working at. For players that are currently running with a level 2 Inn/Tavern, this makes it much easier to figure out what traits and abilities you should be recruiting for, and which ones you have completely covered. Again, mousing over the icon will pop up a list of which followers carry that particular ability or trait, as well as their status -- whether they are working a building, out on a mission, currently inactive, or ready to go.
It might not seem like a lot of changes, but Master Plan takes the mission and follower interface from relatively easy to use interface to a much more useful tool. While I'm not particularly a fan of the one-click mission completion, I can see where the option would appeal to people that don't want to spend forever clicking through missions in between dungeons, dailies, raids, or whatever other business they have on Draenor. What I really appreciate about this particular addon is both the low-key design -- Foxlit has pretty much just gone through the existing interface and seamlessly added useful tools where they are needed -- and also the way in which it presents information. Being able to see at a glance all of my followers various abilities and traits in one place makes it much, much easier to keep track of them all. If you've been struggling with the mission interface, or trying to keep track of who does what in your stable of followers, Master Plan is definitely worth checking out
It might not seem like a lot of changes, but Master Plan takes the mission and follower interface from relatively easy to use interface to a much more useful tool. While I'm not particularly a fan of the one-click mission completion, I can see where the option would appeal to people that don't want to spend forever clicking through missions in between dungeons, dailies, raids, or whatever other business they have on Draenor. What I really appreciate about this particular addon is both the low-key design -- Foxlit has pretty much just gone through the existing interface and seamlessly added useful tools where they are needed -- and also the way in which it presents information. Being able to see at a glance all of my followers various abilities and traits in one place makes it much, much easier to keep track of them all. If you've been struggling with the mission interface, or trying to keep track of who does what in your stable of followers, Master Plan is definitely worth checking out
|
Up:5/3/2019
|
|
